
7. DOM
A very important and widely used feature is the ability to manipulate HTML, also called the DOM, however we need: create new tags, modify existing ones, delete, change text, attributes, add styles... and almost any element you can think of.
Currently there is a change of strategy for rendering a dynamic page. Traditionally, HTML was generated on the backend and the frontend was only responsible for modifying tags in response to some event. Nowadays the tendency is to gather all the information from the backend, through an API using Fetch in JSON format, and render the HTML on the frontend with some rendering framework (Vue, React, Angular...). Its advantages are numerous, but going deeper into that approach is not the goal of this lesson.
On the web you'll find a popular library called JQuery. It has fallen out of use because the latest versions of the JavaScript standard already provide more than enough tools to achieve the same results, so avoid adding it to your project.
Let's focus on everything JavaScript offers us.
Capturing an element
A selector with one match
This will probably be the option you use the most. With document.querySelector(), you'll capture a single element, and it will return an HTMLElement. An object that represents the tag. As if it were a CSS selector, you must indicate in its input parameter which element you want to obtain.
<h1 id="titulo">Curriculum vitae</h1>const titulo = document.querySelector("#titulo");
console.log(titulo);
// <h1 id="titulo">Curriculum vitae</h1>By id
Not recommended! Use document.querySelector() instead.
You can also capture an element solely by its id.
<h1 id="titulo">Curriculum vitae</h1>const titulo = document.getElementById("titulo");
console.log(titulo);
// <h1 id="titulo">Curriculum vitae</h1>Capturing several elements
We have different ways of capturing an element of the DOM.
A selector with several matches
With document.querySelectorAll() you can capture several elements at once. It will return a list. You must also use a selector, like CSS, to indicate which group of tags you're looking for.
<p class="contacto">Direcciones</p>
<p class="contacto">Teléfono</p>
const contactos = document.querySelectorAll(".contacto");
console.log(contactos);
// [<p class="contacto">Direcciones</p>, <p class="contacto">Teléfono</p>]By tag
Not recommended! Use document.querySelector() instead.
<p>Experiencia</p>
<p>Actitudes</p>
<p>Habilidades</p>
const parrafos = document.getElementsByTagName("p");
console.log(parrafos);
// [<p>Experiencia</p>, <p>Actitudes</p>, <p>Habilidades</p>]By class
Not recommended! Use document.querySelectorAll() instead.
<h1 id="titulo">Curriculum vitae</h1>
<p>Experiencia</p>
<p>Actitudes</p>
<p>Habilidades</p>
<p class="contacto">Direcciones</p>
<p class="contacto">Teléfono</p>
<a href="http://papelera.com/" id="enlace">Ya le llamaremos</a>
const contactos = document.getElementsByClassName("contacto");
console.log(contactos);
// [<p class="contacto">Direcciones</p>, <p class="contacto">Teléfono</p>]Styles
Now that we know how to capture DOM elements, let's manage their styles.
Read
Starting from the following HTML and CSS.
#titulo {
  color: orange;
}
<h1 id="titulo">Curriculum vitae</h1>We capture the tag, not the CSS, from which we'll get the information, and we work with style followed by the style we're looking for.
const DOMTitulo = document.querySelector("#titulo");
const colorTitulo = DOMTitulo.style.color;

console.log(colorTitulo);
// orange
Add or overwrite
We continue with the same strategy.
#titulo {
  color: orange;
}
<h1 id="titulo">Curriculum vitae</h1>This time we overwrite the element's style by assigning a new value.
const DOMTitulo = document.querySelector("#titulo");
titulo.style.color = "white";

console.log(titulo.style.color);
// white

console.log(titulo);
// <h1 id="titulo" style="color: white">Curriculum vitae</h1>
As you can see, it has created the style attribute with the new property. It does this so that the style we applied can't be overridden by the CSS cascade.
Delete
You can only remove styles added by JavaScript. To do so, you just need to assign null as the value.
#titulo {
  color: orange;
}
<h1 id="titulo">Curriculum vitae</h1>const titulo = document.querySelector("#titulo");
titulo.style.color = "white";
titulo.style.color = null;
console.log(titulo.style.color);
// orange
console.log(titulo);
// <h1 id="titulo" style="">Curriculum vitae</h1>Attributes
Read
<a href="http://dominio.com/" id="enlace">Otra página</a>const miHref = document.querySelector("#enlace").getAttribute("href");
console.log(miHref);
// "http://dominio.com/"Modify
<a href="http://dominio.com/" id="enlace">Otra página</a>const enlace = document.querySelector("#enlace");
enlace.setAttribute("href", "http://falso.com/");
console.log(enlace.getAttribute("href"))
// "http://falso.com/"Delete
<a href="http://dominio.com/" id="enlace" target="_blank">Otra página</a>const enlace = document.querySelector("#enlace");
enlace.removeAttribute("target");
console.log(enlace)
// <a href="http://dominio.com/" id="enlace">Otra página</a>Classes
classList: Read
<article id="mi-articulo" class="container center">const miArticulo = document.querySelector("#mi-articulo");
console.log(miArticulo.classList);
// ["container", "center"]add: Add
<article id="mi-articulo" class="container center">const miArticulo = document.querySelector("#mi-articulo");
miArticulo.classList.add("hide");
console.log(miArticulo.classList);
// ["container", "center", "hide"]remove: Remove
<article id="mi-articulo" class="container center">const miArticulo = document.querySelector("#mi-articulo");
miArticulo.classList.remove("container");
console.log(miArticulo.classList);
// ["center"]toggle: Toggle
If the class exists, it removes it. If it doesn't exist, it adds it.
<article id="mi-articulo" class="container center">const miArticulo = document.querySelector("#mi-articulo");
miArticulo.classList.toggle("container");
miArticulo.classList.toggle("hide");
console.log(miArticulo.classList);
// ["center", "hide"]DOM
Create
Let's generate a new tag, one that doesn't yet exist in the HTML.
We start from the following code.
<div id="articulo"></div>1) We create the tag and store it in a variable to manage it.
const titulo = document.createElement("h1");2) We modify it. In this case I'll add some content.
titulo.textContent = "Mi título";3) I'll add it to another existing part of the DOM.
document.querySelector("#articulo").appendChild(titulo);The result.
<div id="articulo">
  <h1>Mi título</h1>
</div>
Delete
We can use the reference we saved when creating it, with removeChild().
const titulo = document.createElement("h1");

document.querySelector("#articulo").removeChild(titulo);
Or capture the element directly and then delete it with remove().
document.querySelector("h1").remove();Templates
When you need to generate a large block of HTML that carries a certain amount of complexity, you can simplify your life by creating a template that you'll then clone for use in your iterations.
<!doctype html>
<html lang="en">
    <head>
        <meta charset="UTF-8"/>
        <title>Document</title>
    </head>
    <body>

        <nav id="nav">
            <ul id="nav__ul"></ul>
        </nav>

        <!-- Templates -->
        <template id="enlace">
            <li>
                <a href=""></a>
            </li>
        </template>

        <script>

         // Variables
         const misEnlaces = ["inicio", "nosotros", "contacto"];
         const navUl = document.querySelector("#nav__ul");
         // I capture the template content
         const templateLi = document.querySelector("template#enlace").content.firstElementChild;

         misEnlaces.forEach(function(enlace) {
             // I clone the template
             const nuevoLi = templateLi.cloneNode(true);
             // I customize the information
             nuevoLi.querySelector("a").textContent = enlace;
             nuevoLi.querySelector("a").setAttribute("href", "".concat(enlace, ".html"));
             // I add it to my <ul>
             navUl.appendChild(nuevoLi);
         });

        </script>
    </body>
</html>
The generated result would look like this.
<nav id="nav">
    <ul id="nav__ul">
        <li>
            <a href="inicio.html">inicio</a>
        </li>
        <li>
            <a href="nosotros.html">nosotros</a>
        </li>
        <li>
            <a href="contacto.html">contacto</a>
        </li>
    </ul>
</nav>
cloneNode(true)clones the object along with all its children, whilecloneNode()clones only the parent object.
Cloning objects
Be careful with references! Why can we store a DOM element in a constant and still modify its content? Because in JavaScript, references to the object are stored, as if it were a C pointer. In other words, you store the address where it lives in memory. This leads to the following situations.
const persona1 = { edad: 42 };
const persona2 = persona1;
persona1 === persona2; // true, same reference

const persona3 = { edad: 42 };
persona1 === persona3; // false, different reference, even though the data is the same
Solution: always clone. You can use structuredClone(objecto) if it's an object or JSON. In the case of captured DOM elements, use cloneNode(), as we saw earlier.
const persona4 = structuredClone(persona1);
persona1 === persona4; // false
Avoid using the JSON.parse(JSON.stringify(objecto)) technique to clone objects, since it converts the objects to a string. For example, it will turn a new Date(123) value into "1970-01-01T00:00:00.123Z".
Parsing text into HTML
The insertAdjacentHTML function lets you convert text into DOM elements.
For example:
<p id="mi-p"></p>const miP = document.querySelector("#mi-p");
miP.insertAdjacentHTML("beforeend", "<span>Texto</span>");The result would be:
<p id="mi-p">
    <span>Texto</span>
</p>
It's not a quick replacement for everything we've seen so far. First, you lose the references to the created elements, so you won't be able to modify them. And second, it's not safe, because it can be an XSS attack vector (code injection). So use it with caution, and if possible, avoid it.
The first parameter of insertAdjacentHTML can be:
beforebegin: Before the element.afterbegin: Inside the element, before its first child.beforeend: Inside the element, after its last child.afterend: After the element.
While the second parameter is the text you want to convert into DOM elements.
Don't confuse
insertAdjacentHTMLwithinnerHTML. The former adds HTML elements, while the latter overwrites the entire content of the element. For example, if you useinnerHTMLto add a new field to a form, you'll lose the values already entered by the user.
Activity 1
Display a name alongside 2 buttons at its side: 'Present', 'Absent'.
- When 'Present' is pressed, the name should turn green and the buttons should disappear.
- When 'Absent' is pressed, the name should turn red and the buttons should disappear.
Nightmare level 👹
- Display a list with several names. The functionality should be the same.
- If 'Absent' is pressed, instead of removing both buttons, a button with the text 'Running late' should appear. When pressed, it should turn yellow.
Activity 2
Starting from a JSON where you've structured the information of a portfolio, display the content with an appropriate, elaborate HTML layout. You can rely on an HTML framework.
One possibility.
const portafolio = [
    {
    nombre: 'Gafas el tuerto',
    anyo: 2021,
    categoria: 'Web',
    imagen: 'foto.jpg',
    descripcion: 'Una e-commerce para la venta de monoculos baratos.'
    },
    {
    nombre: 'Ropa sucia',
    anyo: 2019,
    categoria: 'APP',
    imagen: 'foto2.jpg',
    descripcion: 'Red social de solteros que viven solos.'
    }
...
]- Create a field that filters by name as you type.
- Add buttons to filter the content by category.
- Add to the filter a
selectlisting all the years found in the JSON.
Activity 3
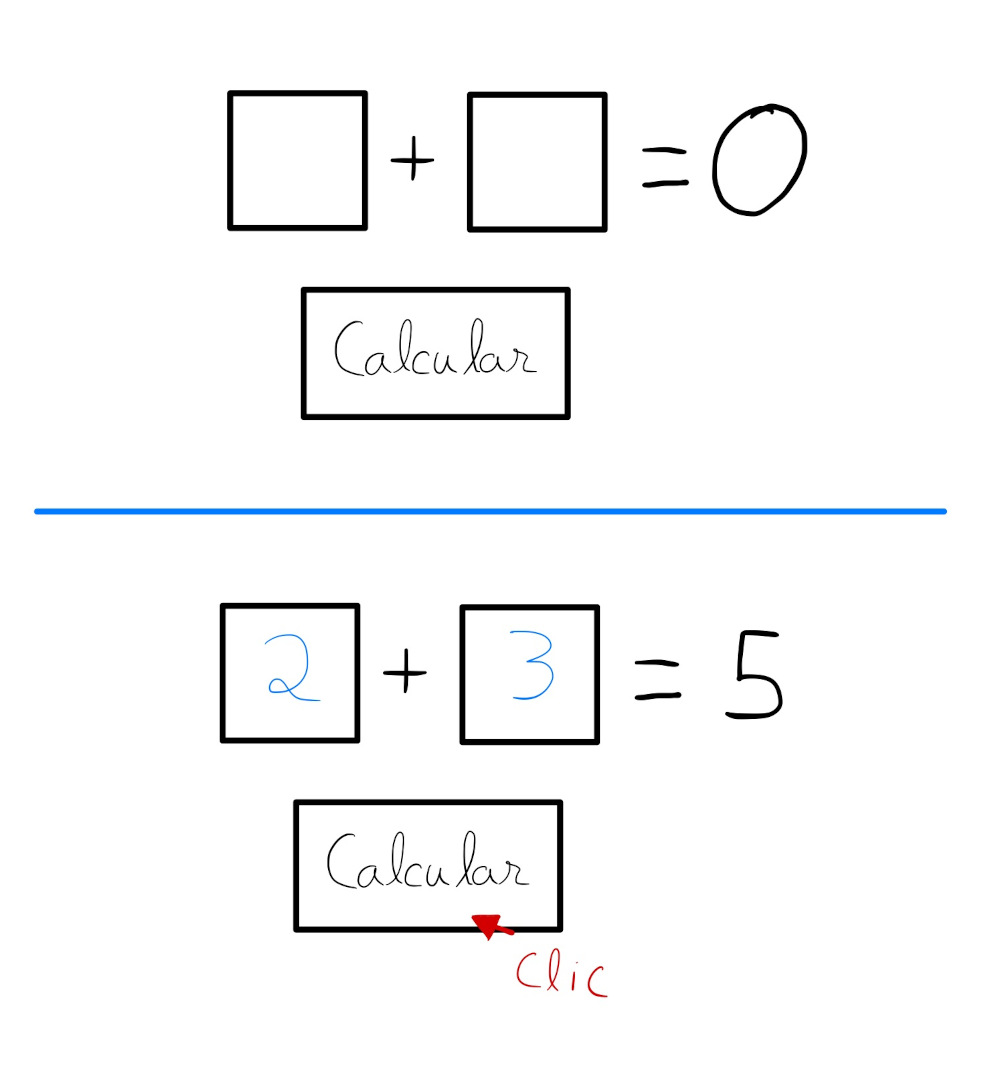
In 2 inputs, enter numbers. When the button labeled Calculate is pressed, they should be added together and the result displayed.
Activity 4
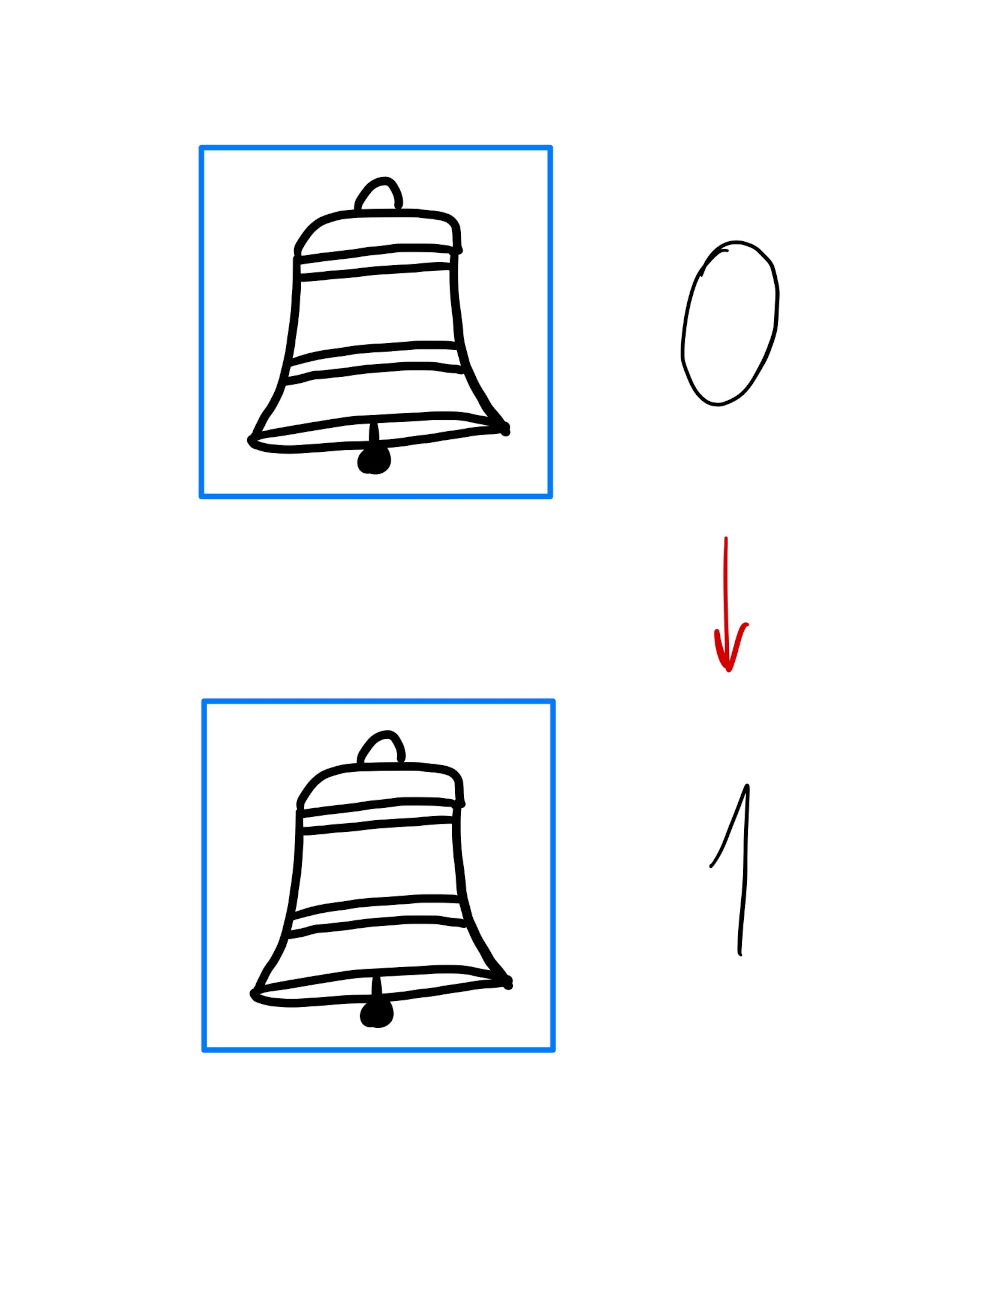
When the bell button is pressed, the number next to it should increase.
Activity 5
Create a website that randomly changes its background color every second.
Hint: In the Mozilla documentation there are different techniques for getting random numbers within a range.
Activity 6
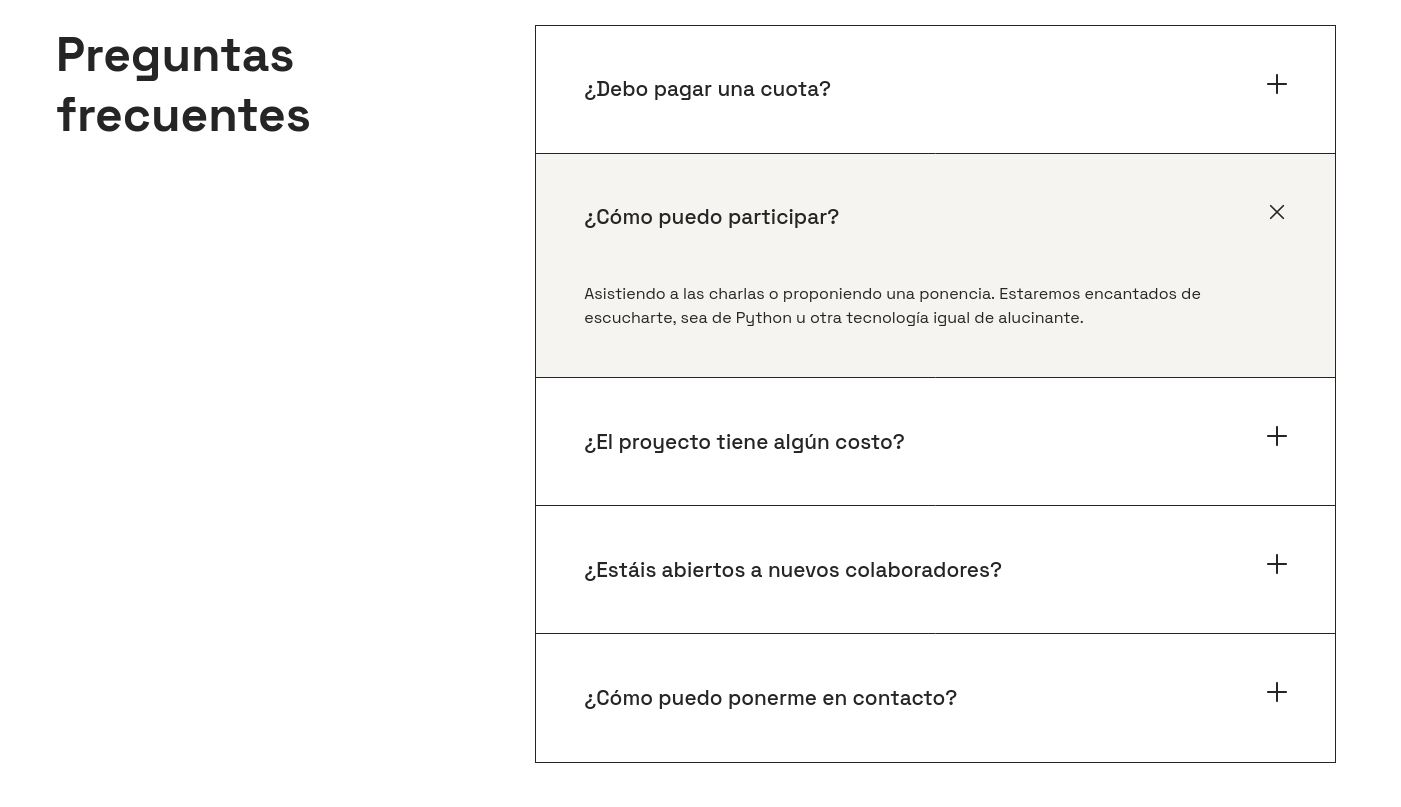
When the element is pressed, it should expand, or grow, until it shows the answer to the question. If pressed again, it should collapse, or return to its previous state.
Activity 7
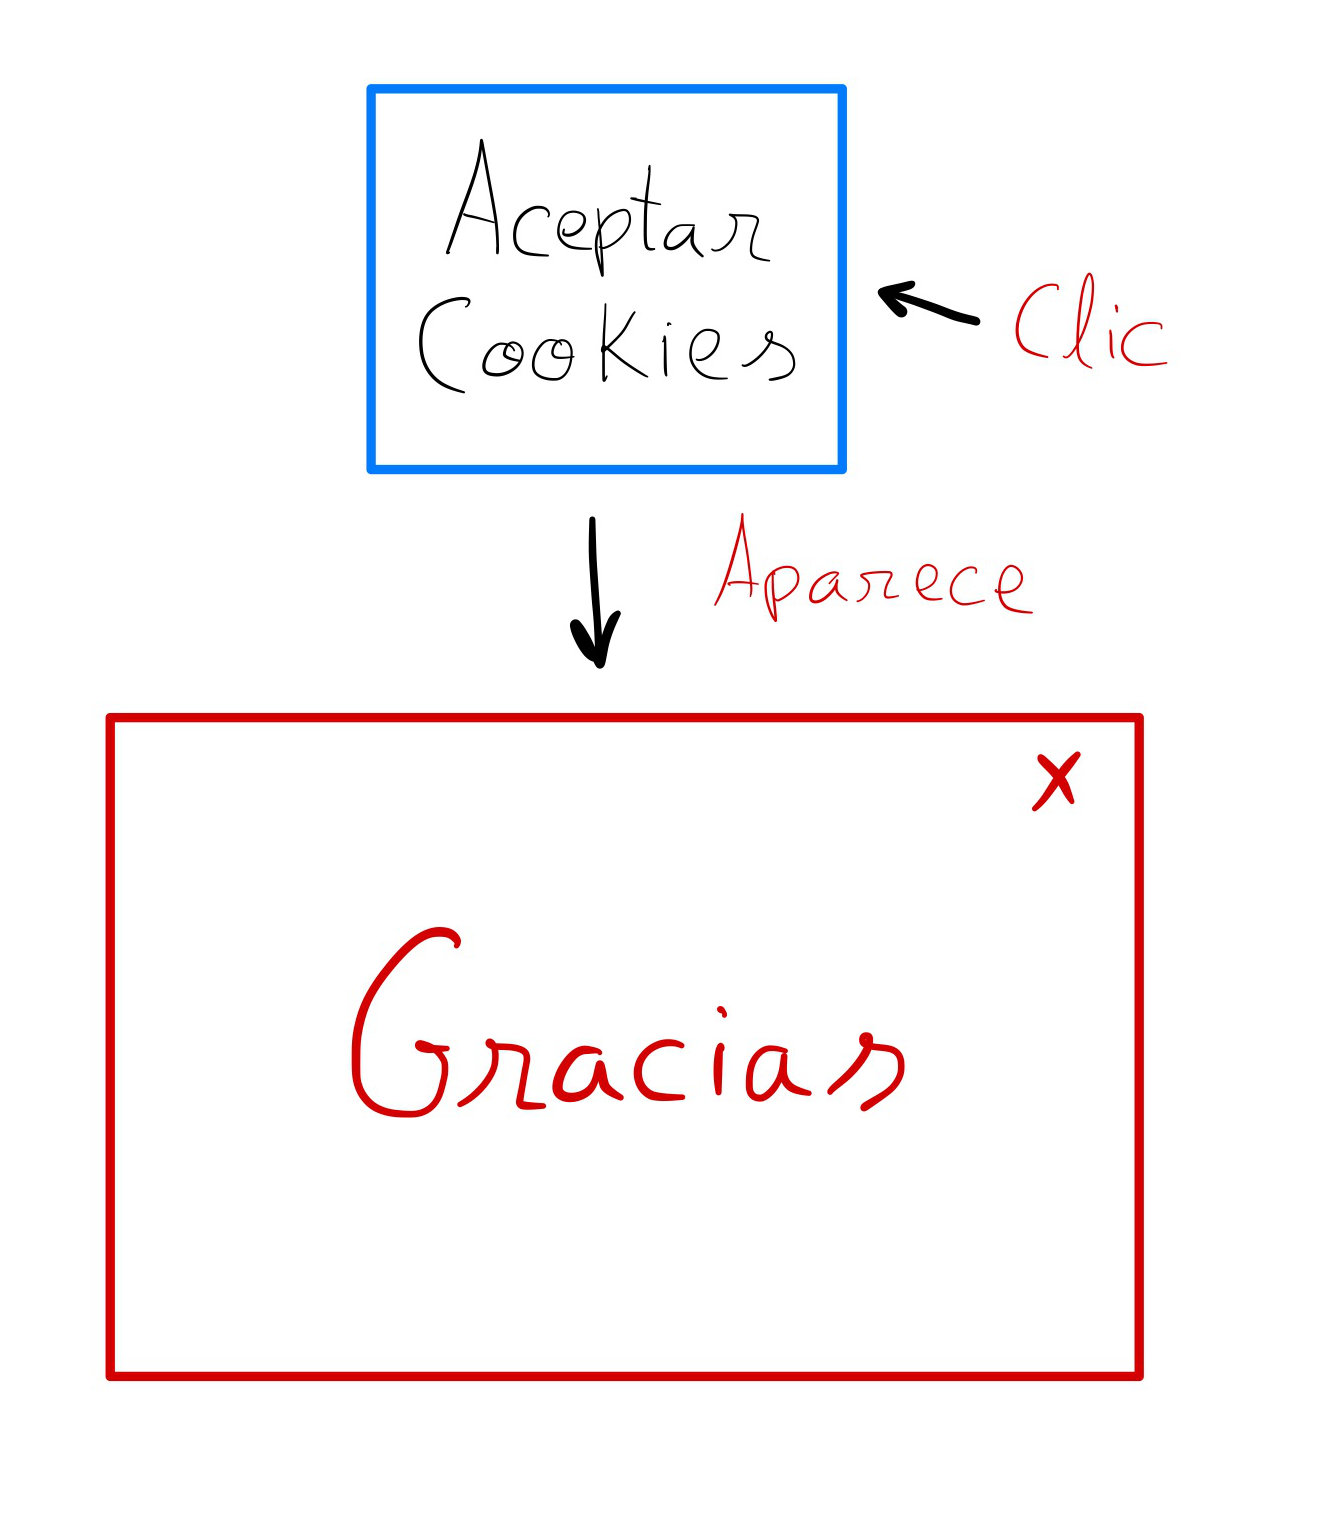
When the button is pressed, a message (modal) should appear.
Nightmare level 👹
When the modal's close cross is pressed, it should be hidden.
Activity 8
Create a textarea with a character limit of 100. To inform the user, show the remaining characters.
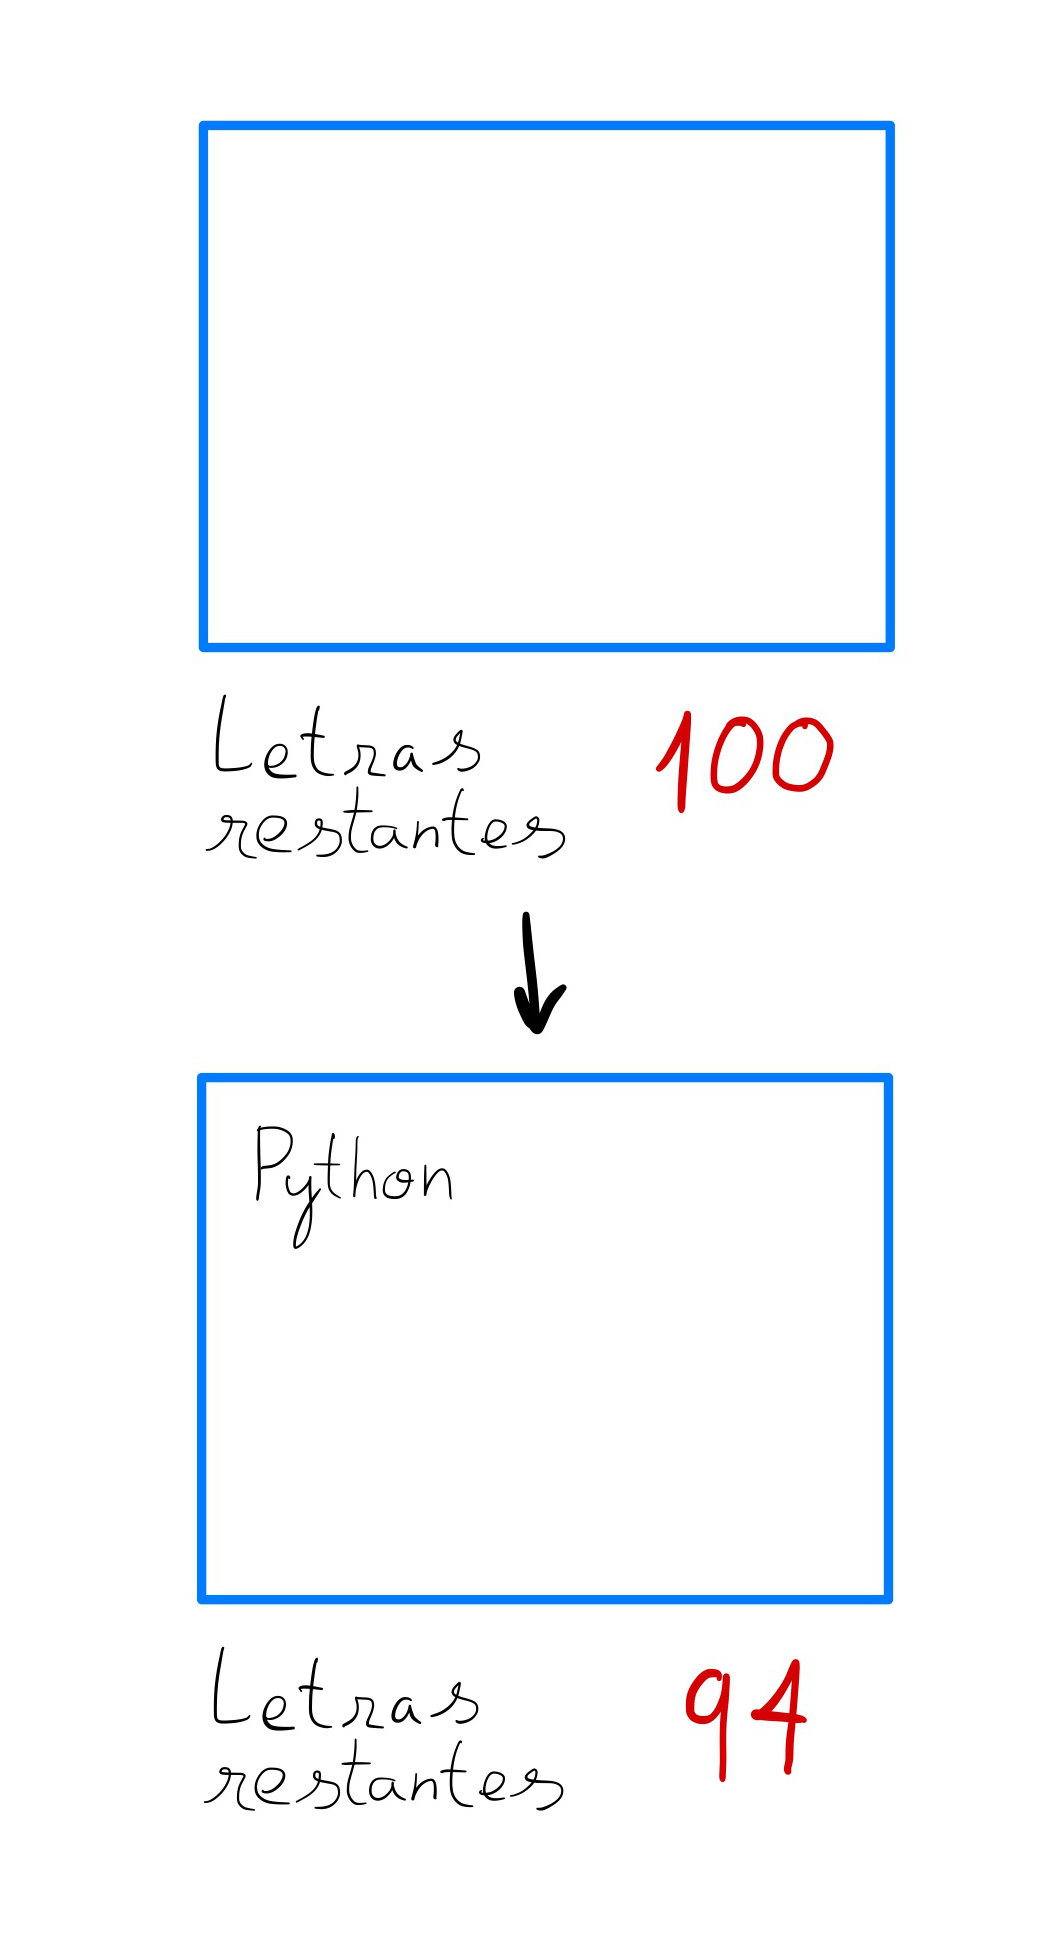
Activity 9
When the Start button is pressed, the number should increase every second.
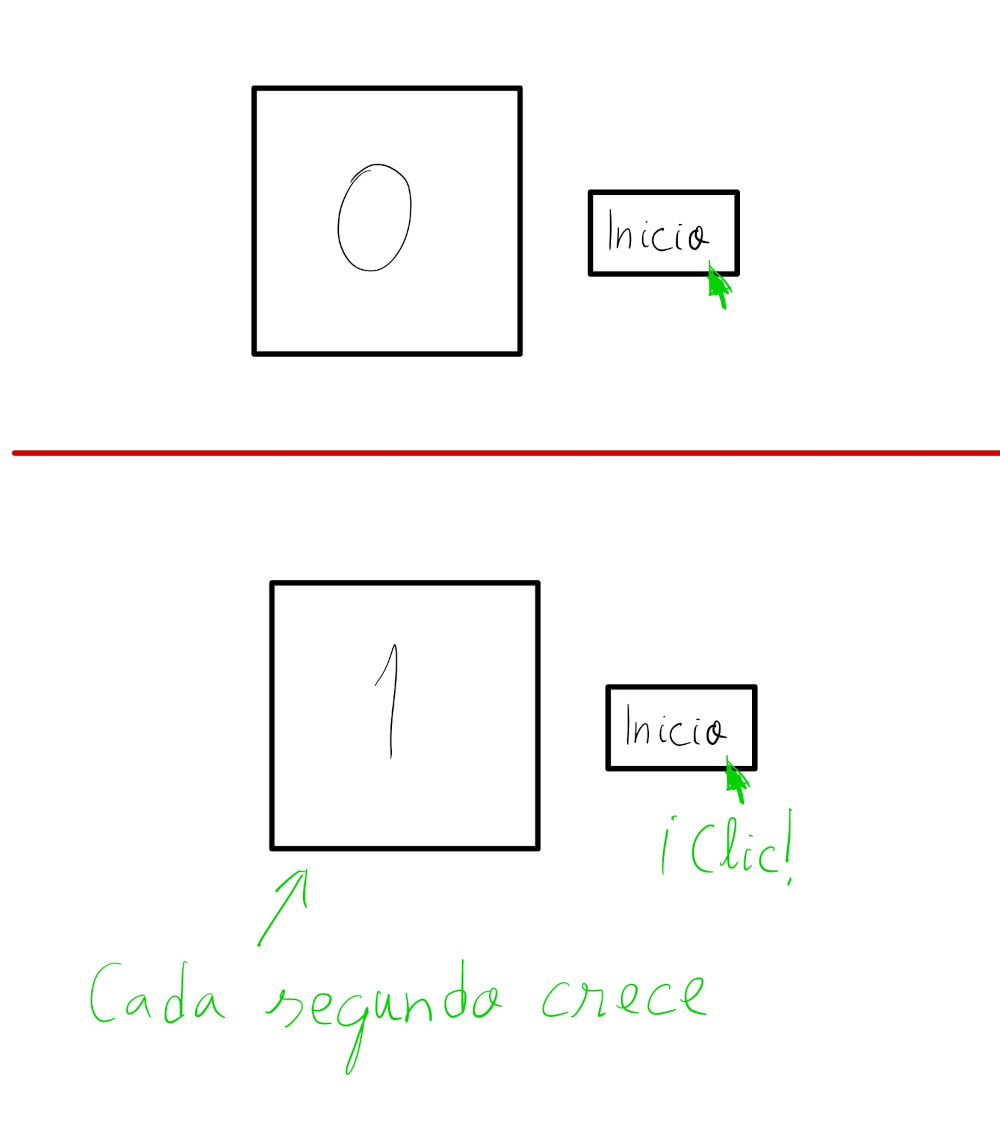
Activity 10
Display the current day using Date().
Nightmare level 👹
Show the day and the time.
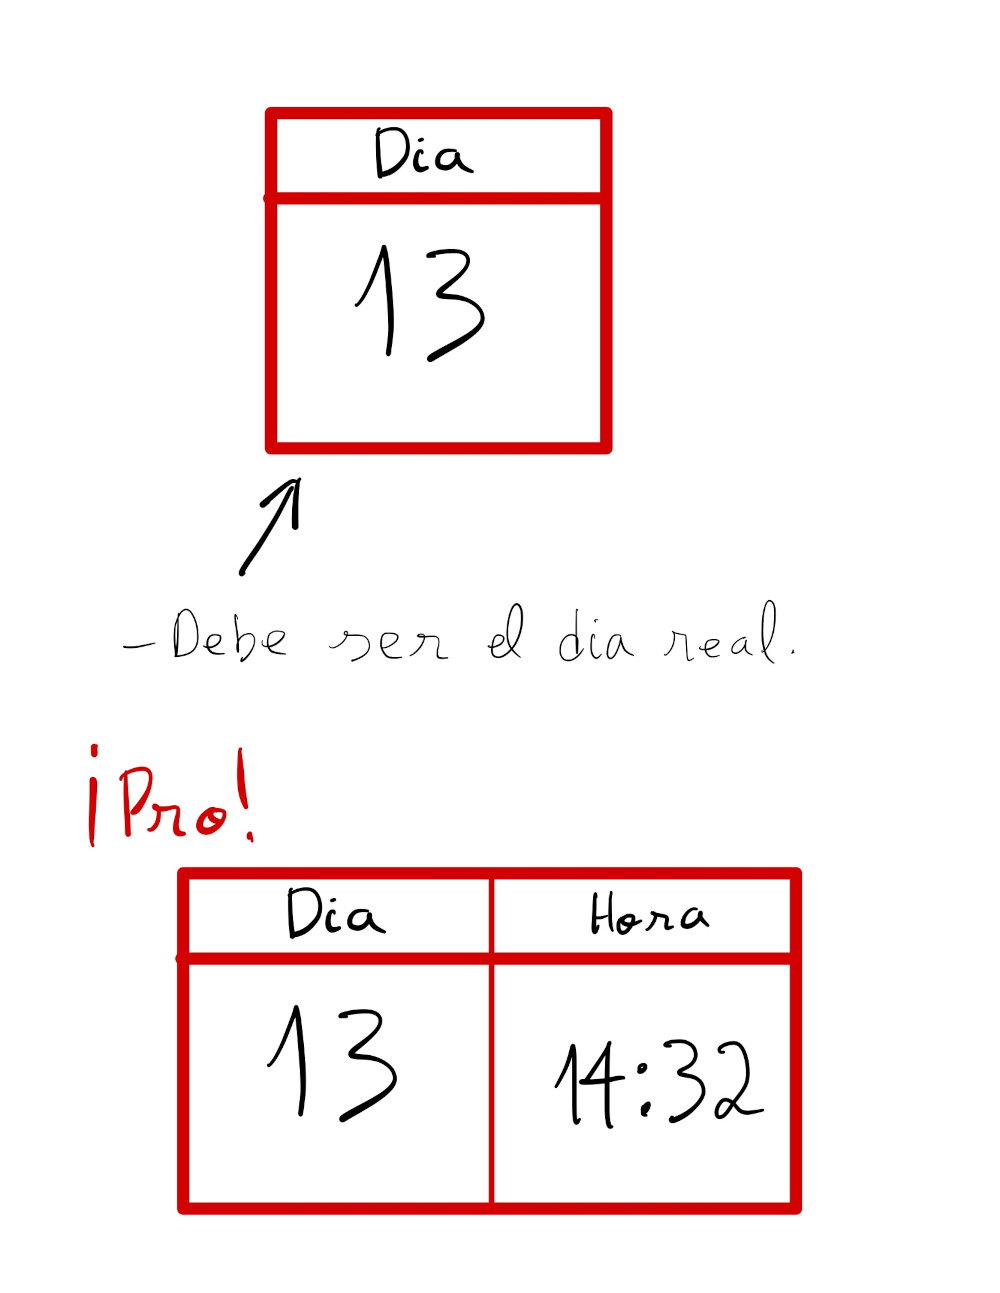
Activity 11
Create a visual editor for a simple paragraph. In the example, the text "Karate" is used, in black color and size 12.
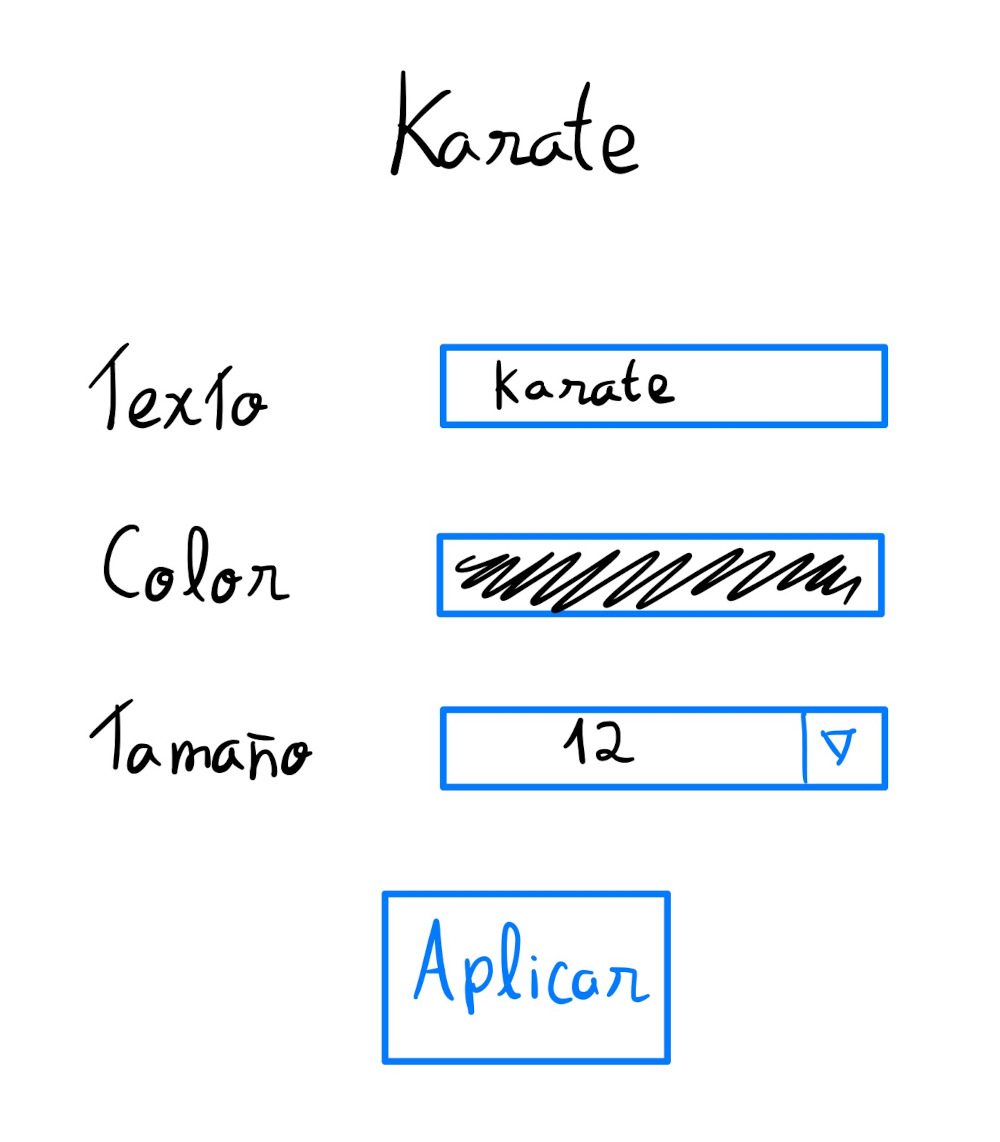
Activity 12
Randomly draw 3 numbers between 0 and 9.
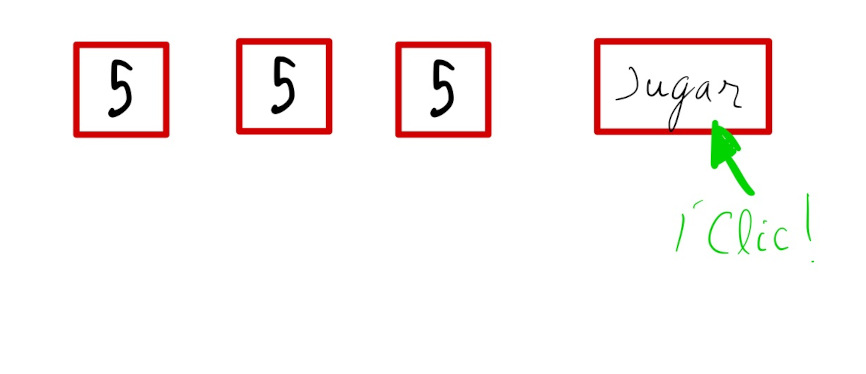
Nightmare level 👹
- Add a credits field.
- If the 3 numbers match, add 10 credits.
- If you lose, subtract 1 credit.
Activity 13
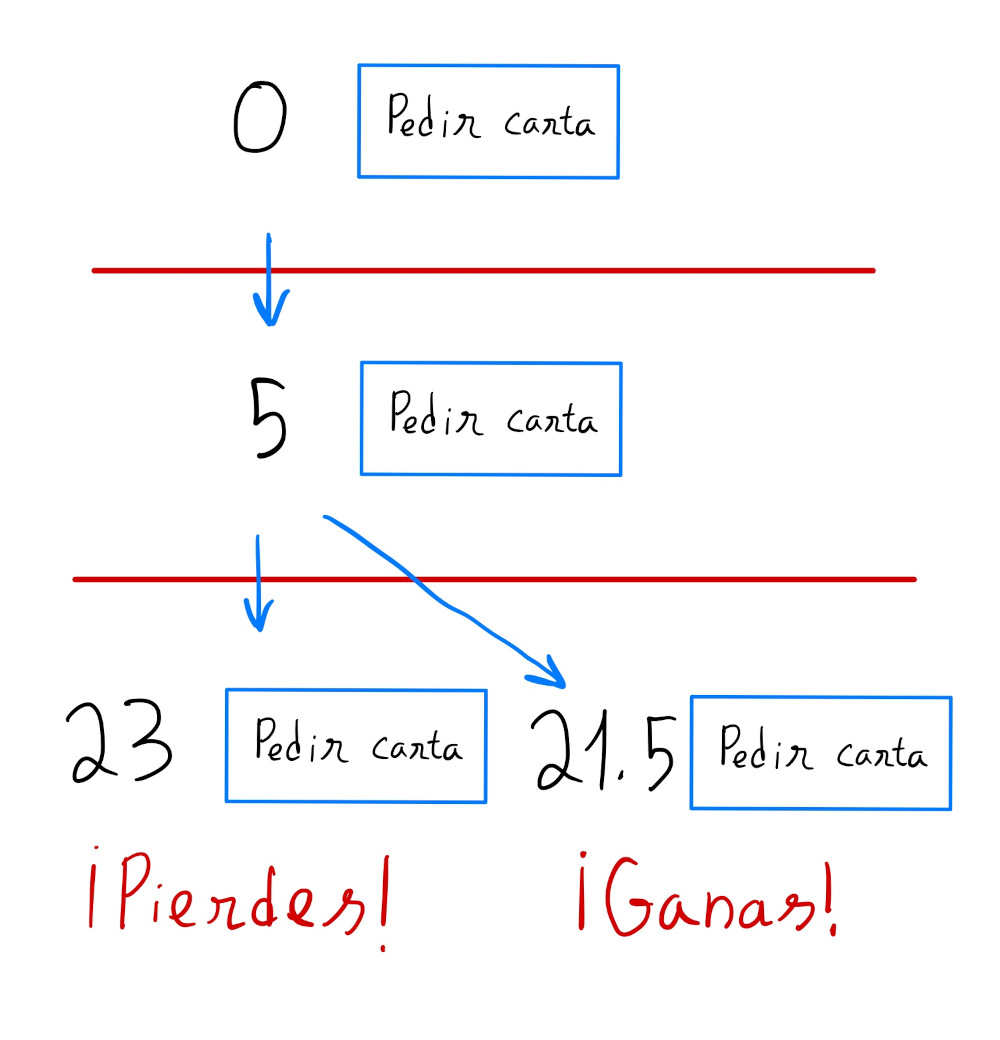
When a card is requested, a random card should be moved from the deck to the player's hand. If it reaches 21.5, the player wins. Otherwise they lose.
Start from the following information.
const baraja = [
  1, 2, 3, 4, 5, 6, 7, 0.5, 0.5, 0.5
  1, 2, 3, 4, 5, 6, 7, 0.5, 0.5, 0.5
  1, 2, 3, 4, 5, 6, 7, 0.5, 0.5, 0.5
  1, 2, 3, 4, 5, 6, 7, 0.5, 0.5, 0.5
];
let mano = [];
Activity 14
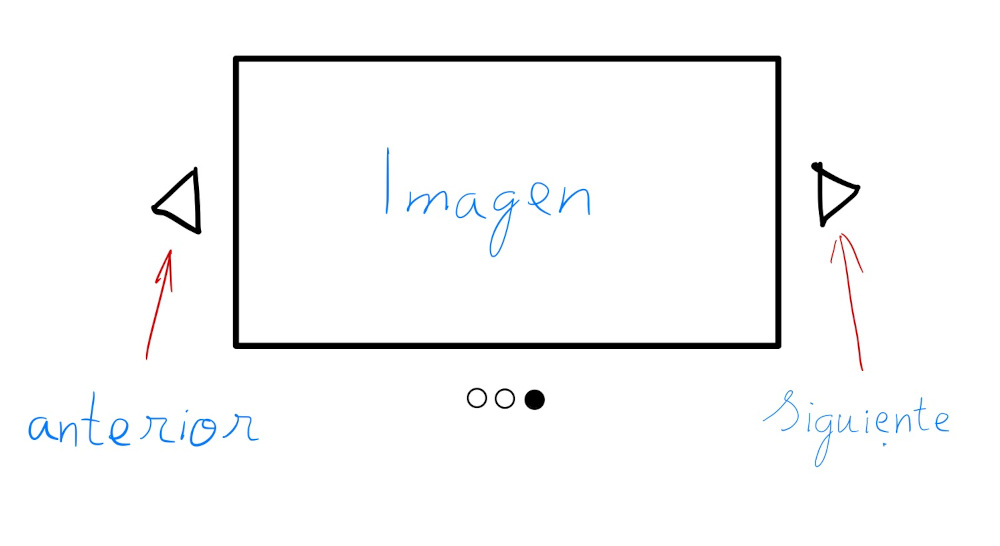
Create a carousel with the following features.
- If the right button is pressed, it should move to the next slide.
- If the left button is pressed, it should go back.
- It should behave like a loop. If it reaches the last slide, it should go back to the first, for example.
- Add a circle, as a radio button, for each image. When clicked, it should switch to that image.
Nightmare level 👹
Add a button that, when pressed, makes it switch to the next image every second.
Activity 15
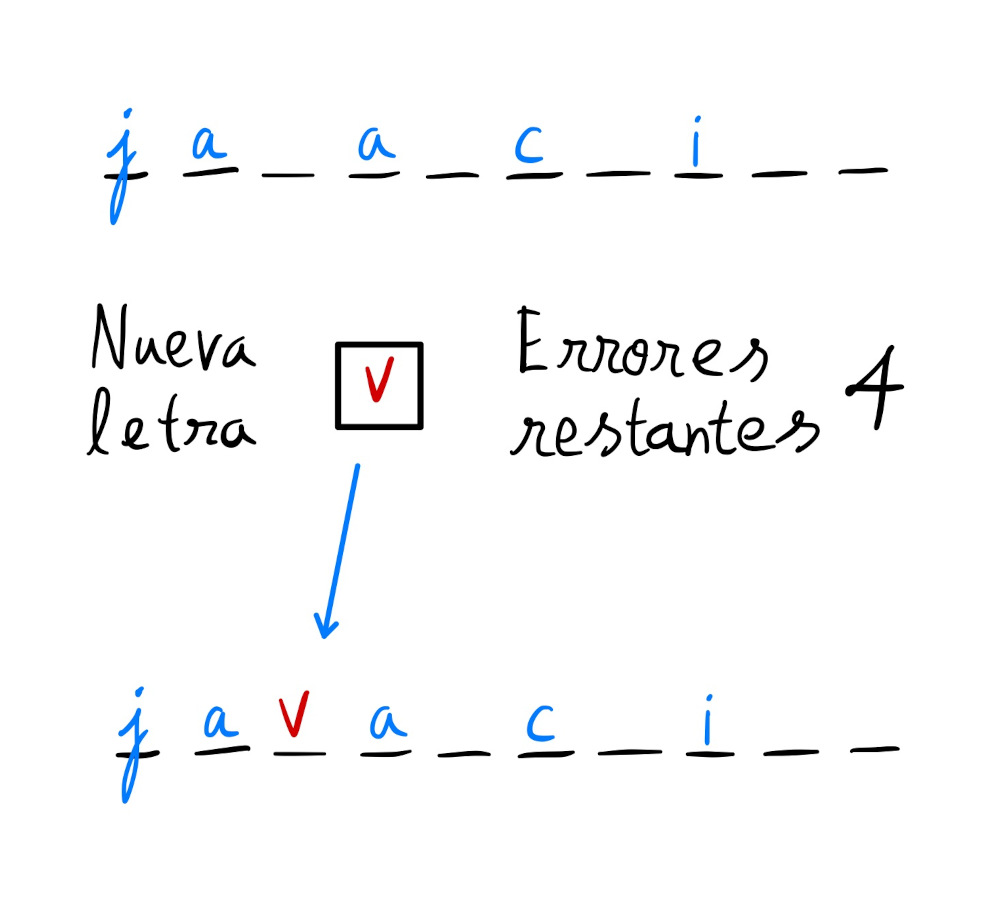
Build the hangman game.
- If the letter is not guessed correctly, the failure counter should decrease.
- If the letter is guessed correctly, it should be revealed.
- When there are no gaps left, the player is informed that they have won.
- If there are no failures left, the player is also informed.
Nightmare level 👹
- In each game, the word to guess should change.
- Show a drawing of a man instead of the failure counter.
Activity 16
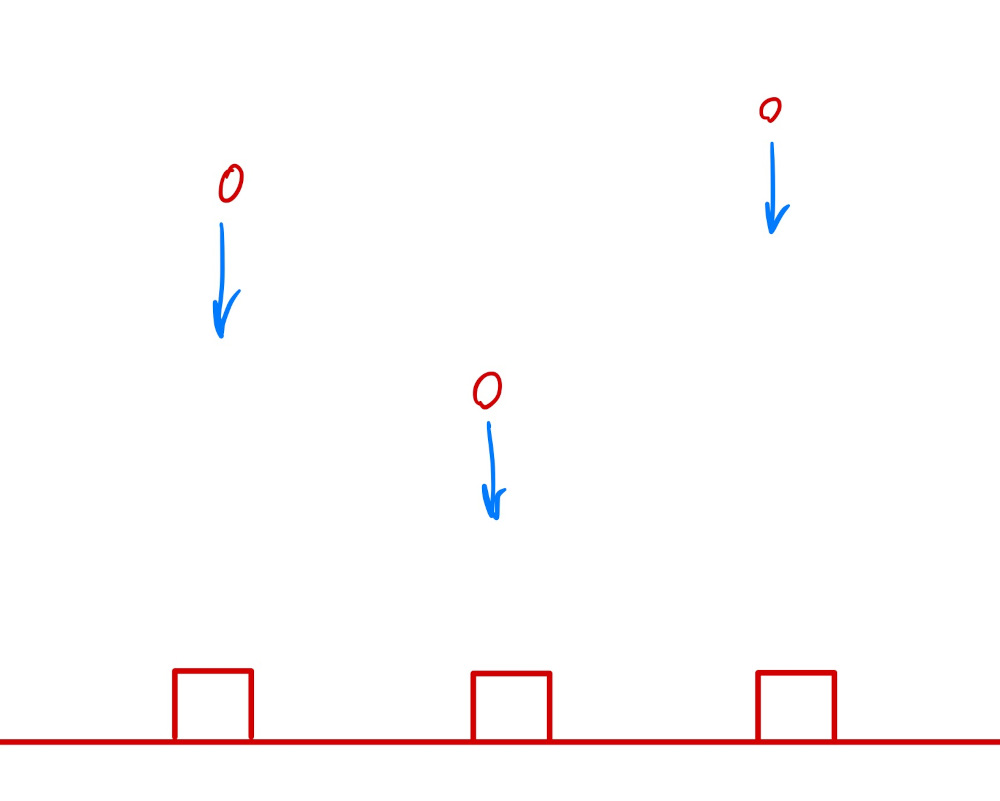
We're under a nuclear attack in 8-Bit!
- Randomly create a missile that descends from the sky to the bottom of the page. You'll have 3 vertical lanes to place it in.
- If it's clicked, it should disappear (`click` event).
- If it collides with the ground, it will destroy the base (`animationend` event).
- When there are no bases left, the game is lost.
- When 10 missiles are destroyed, the game is won.
:quality(85)/https://andros.dev/static/img/components/license/by-nc-nd.png)
This work is under a Attribution-NonCommercial-NoDerivatives 4.0 International license.

Building SPAs with Django and HTML Over the Wire: Learn to build real-time single page applications with Python
The HTML over WebSockets approach simplifies single-page application (SPA) development and lets you bypass learning a JavaScript rendering framework such as React, Vue, or Angular, moving the logic to Python. This web application development book provides you with all the Django tools you need to simplify your developments with real-time results.
Buy the bookHelp me keep writing
Every coffee gives me a push toward the next article.
 Sure, it's on me!
Comments
There are no comments yet.